


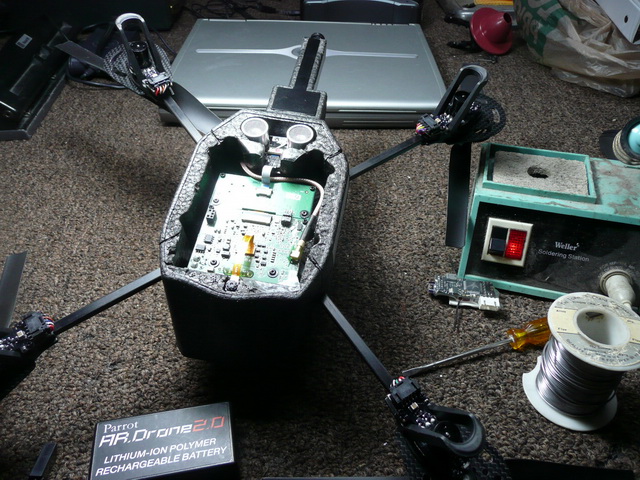
This is the AR Drone 2.0 being controlled with my Motorola Razrmaxx HD smart phone. I voided the warranty within the first week by starting to make modifications and improvements. My wife said I didn't wait that long and probably voided the warranty on the day it arrived.
AR.Drone 2.0 on-board technology is quite impressive:
- 1 GHz 32 bit ARM Cortex A8 processor with 800MHz video DSP TMS320DMC64x
- 16bit DDR2 RAM at 200MHz
- Wi-Fi b/g/n
- 3 axis accelerometer +/- 50mg precision
- 3 axis gyroscope 2000 degree/second precision
- Pressure sensor +/- 10 Pa precision (80cm / 2.6 feet at sea level)
- 60 fps vertical QVGA 640 x 480 SD camera for ground speed measurement, recordable on smartphone or USB drive
- Front Facing HD Camera 1280 x 720 HD video sent to your smartphone or USB drive
- 3 axis magnetometer 6 degree precision
- Ultrasound sensors for ground altitude measurement
- Linux 2.6.32
- USB 2.0 high speed for extensions
- 8 MIPS AVR CPU per motor controller - each motor has its own dedicated micro controller
- 4 brushless inrunner motors with micro ball bearing and rare earth magnets, 14.5 watt & 28,500 rpm when hovering
- JPG Photo Capture
- Optional GPS module with flight weighpoints and return to home features.
The AR Drone 2.0 is controlled over Wifi from an Android or iPhone smartphone. There are apps from the manufacturer as well as some excellent third-party apps. The range is limited to about 165 feet. The Drone's antenna is intergated with the main board. It is simply a copper trace on the board. It's not too efficient and it's directional.
In order to improve the Wifi signal range I installed an external Wifi antenna from DroneMod.COM. This is a kit of parts that includes a mast-mounted 2.4 GHz. disc antenna, feedline, mounting hardware and antenna jack. The mod is not for the faint of heart. You have to cut a trace on the main board, remove a surface mount inductor and solder a very small MMCX UHF connector to the board. You need a micro soldering iron and good eyesight. I had trouble seeing the tiny details. The instructions were very good.
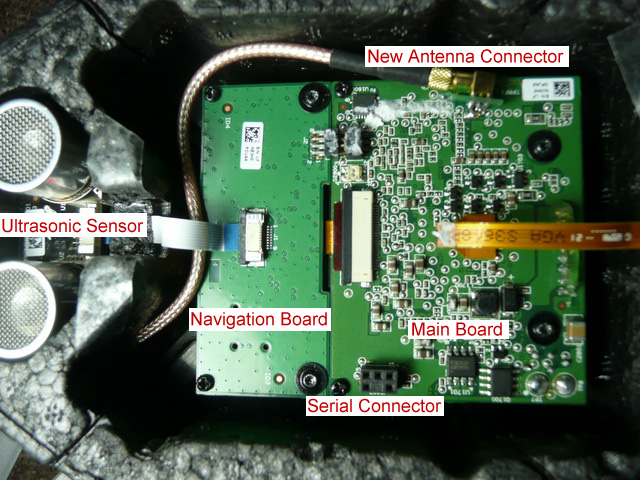
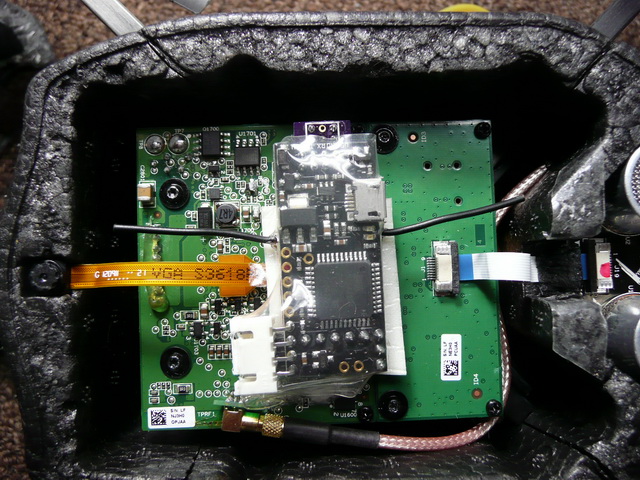
From this picture you can see the new coaxial cable that was added. It goes from the lower left and curves in an S-shape to the upper right where it plugs into the MMCX connector that was soldered to the main board. I performed a very crude before and after test by connecting to the Drone and watching its video signal while walking away. After the new antenna was installed I could walk significantly further away before losing the video. The performance should be even better when flying because of the line-of-sight characteristics available. Going from left to right you can see the ultrasonic Sonar unit. Just to the right of it is the Navigation Board. It looks bare because all the components are on the underside of the board. The Navigation Board processes the signal from the ultrasonic sensor and contains the altimeter to monitor height, a 3-axis digital accelerometer to monitor positional movements, a 2-axis gyroscope and a precision piezoelectric gyroscope for Pitch (Elevator), Roll (Aileron) and Yaw (Rudder) measurements and a 3-axis magnetometer for orientation positioning. The Navigation Board is connected to the Main Board with only an 8-pin connector.
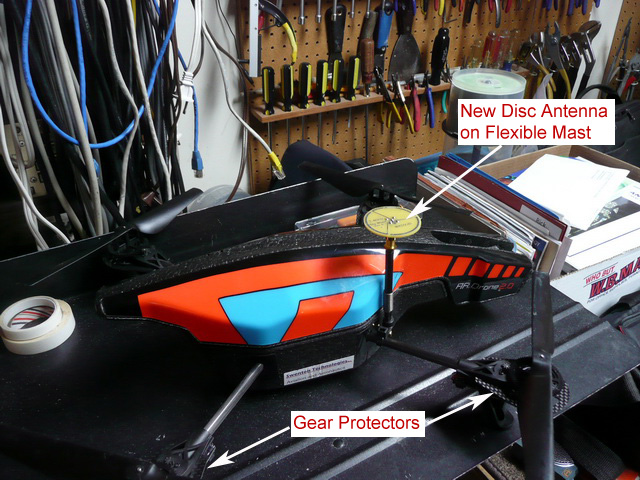
Here's the view of the finished external antenna mod. The antenna is mounted to one of the cross arms. The antenna mast is spring-loaded at the base so it can handle a crash without breaking off. You might also notice I added the carbon fiber gear protectors. When flying with the outdoor hull it is very easy to damage one or more gears during a crash. The gear protectors extend beyond the gear teeth and would bear the impact force during a crash.
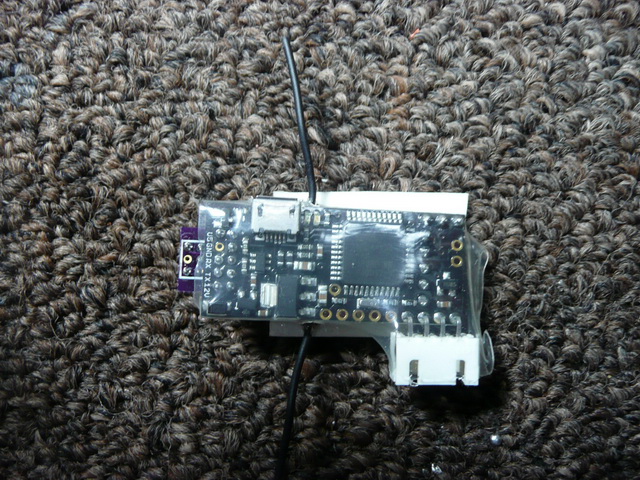
The next step in the Ar Drone 2.0 transformation is to be able to control the Drone with a real Radio Controlled RC Transmitter like the ones they use to fly model airplanes and helicopters. Flying by smartphone is cute and convenient. There are a lot of features built into the smartphone software that intergate nicely into controlling the Drone. But the Wifi range is limited and the flying controls using the touch screen are just not the same as using mechanical joy sticks. So enter the MiruMod. I purchased this one from trans-island on eBay. This is actually two boards sandwiched together. Kit includes an Arduino(comptaible) Nano 3.0 microcontroller, and a DSM2 compatible Receiver with binding plug. The controller has an onboard USB connector which is used to upgrade or modify the software and to monitor the data stream using a laptop. The MiruMod board plugs into the Drone's serial connector on the main board. The MiruMod receiver has two wire antennas extending from either side of the board. The mod is self contained. When the mod is installed the ability to fly the Drone by Wifi is preserved. Whether you fly by Wifi or MiruMod simply depends on the sequence you use to connect to the Drone. If you connect the RC transmitter first, then you fly by MiruMod. You can still connect by Wifi and stream the camera video to your phone while you fly by MiruMod DSM2.
Here's a view of the MiruMod installed on the AR 2.0 Main Board. I have it sitting on a pad of double-stick adhesive foam. You can see the black antenna wires sticking out lef and right and the onboard USB jack is on the upper right.
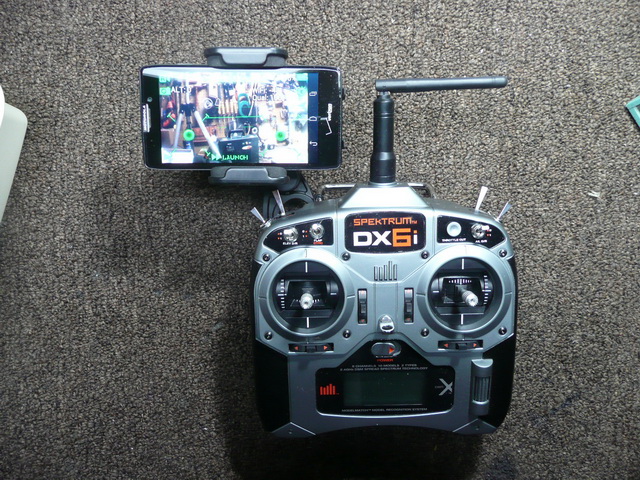
This is the RC transmitter I got to control the AR Drone 2.0 using the MiruMod. It is a Spektrum DX6i.
I modified this DX6i (and of course voided the warranty within a few days) by adding a mounting bracket to hold my smartphone. I can send the video feed from the drone to the phone by Wifi while I am flying the drone over DSM2 using the RC transmitter.
If you are going to order one of these for use with the AR Drone you should order it directly from Horizon Hobby. When flying airplanes the elevation/aileron stick is self centered but the throttle stick is not spring loaded. You may want both sticks spring loaded to self-center when flying the Drone. If you order from Horizon Hobby they will perform the throttle centering mod free of charge before shipping your order. You can also ask to change the transmitter from Mode 2 to Mode 1 which swaps the stick functions around.
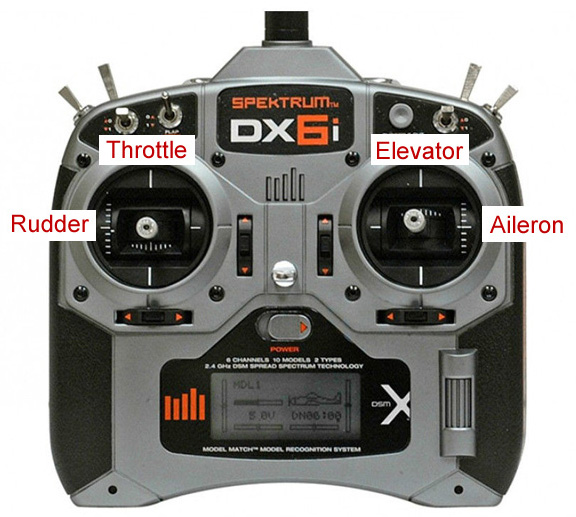
Most RC Transmitters in the US are delivered configured to Mode 2 shown above. The Android smartphone software operates in Mode 3 which is not possible in the DX6i. Only Modes 1 and 2 are available and Horizon Hobby does not recommend changing modes in the field. It's not that hard and there is information out there on how to do it. The real problem is doing the spring centering of the throttle stick. You need to add some pins, a spring and a lever. Horizon Hobby / Spektrum does not sell these parts and requires the transmitter to be returned. I did mine myself. I was creative in sourcing the parts. They say the unit would require factory callibration after the change. That procedure is available on the internet if you search for it and I did not have any problems recallibrating.

Here's am explanation of the different transmitter modes. Remember the smartphone apps default to Mode 3 but many are reconfigurable. Most US Transmitters default to Mode 2 and could require return to factory for reconfiguration. Only the newer or more expensive transmitters can do Modes 3 or 4.
Here are a series of videos from some of my flights this winter. I have before and after videos showing the vast improvement in the video after I balanced the propellers. All you have to do is remove each prop and suspend them on a horizontal pivot such as a small nail. If one blade tends to fall to the bottom then remove a tiny amount of that blade until neither one wants to fall down. Some people prefer to put tape on the lighter blade to make it heavier. That method is reversible. Cutting plastic is not so be careful not to remove too much.
These are large files because they are High Definition videos.
Before Prop Balancing - Notice the side-to-side wobble in the video.
After Prop Balancing - Notice the wobble is gone and the video is so much smoother.
12-31-2013 This was one of my earlier flights by Android Wifi from the front yard. This was after the props were balanced.
01-10-2014 This was my first flight with the DX6i transmitter. It started from my front yard starting out looking to the East and North. I was attempting to look over the tallest tree in my yard which I estimate to be at east 150 feet.
Next I will show how to use an ordinary Linksys WRT54GL router and DD-WRT aftermarket firmware to build a Wifi repeater to extend the Wifi flying range even further. When the router is properly configured it will link your smartphone to the Drone. Using my configuration you do not have to modify any Linux configuration files in the Drone, such as changing from Ad-Hoc Mode to Infrastructure Mode. Everything stays in Ad-Hoc mode. The smartphone connects to the router and the Drone connects to the router. The flying range is now determined by the more powerful Wifi signal coming from the router (with better antennas) instead of the weaker signal coming from your smartphone (with a build-in antenna.)
After installing the DD-WRT firmware in the router be sure to reset the router to the default settings. When you first connect to it you will be required to set a new username and password for the router. Only two screens need to be set. The others can be left as default settings.
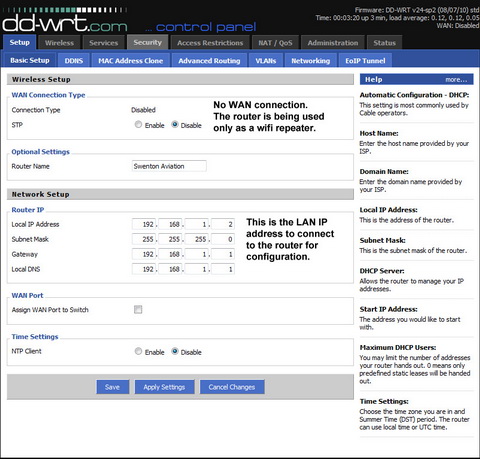
In the setup tab you are going to disable WAN. We are going to use the router only as a Wifi Repeater.
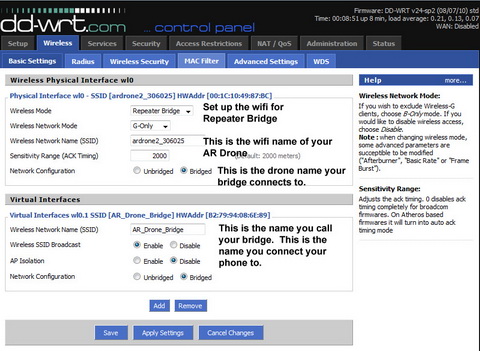
In the wireless tab you will set the Wireless Physical Interface as a Repeater Bridge and make the Network Name match the Wifi name of your AR Drone. For the Virtual Interface, just give it any name. I gave it AR_Drone_Bridge (no spaces).
In the example above my Drone ardrone2_3066025 will connect to the bridge and I will make my smartphone connect to the bridge named AR_Drone_Bridge.
That's it! When you open your favoirite AR Drone flight app on the phone the app will find the drone and it will appear you ar directly connected to the drone.
Avoid a Fly-Away!
Be careful with the signal strength meter on the phone! When using the repeater, the signal strength meter on the phone is the signal strength of the signal between the phone and the bridge and NOT the signal strength of the signal between the drone and the bridge. You could fly the drone out of range even though your phone still shows a strong signal.